I used to think giving up takeout was the hardest part of going keto.
Mongolian beef was my weakness. That sweet, sticky sauce coating tender strips of beef? Absolutely irresistible.
When I started keto, I figured those days were over. But then something clicked. Why not just make it myself?
So I did. And honestly? It’s better than delivery.
This homemade version takes just 25 minutes. That’s less time than waiting for DoorDash. Plus, you know exactly what’s going into it—no mystery ingredients or hidden carbs.
The numbers?
Only 5g net carbs per serving. Compare that to the 45-50g you’d get at a restaurant.
Here’s what shocked me most. My husband—who normally side-eyes my “keto experiments”—couldn’t tell the difference. He actually asked if I’d secretly ordered takeout.
That’s when I knew I’d nailed it.
The Three Swaps That Change Everything
Traditional Mongolian beef is basically a carb bomb. Sugar. Cornstarch. White rice.
All off-limits for keto.
But here’s the thing. You don’t need those ingredients to get that authentic taste. You just need smart substitutions.
Swap #1: The Sweetener
Regular Mongolian beef drowns in sugar. I’m talking tablespoons of the stuff.
I replace it with erythritol-based sweetener. Zero carbs. Same sweetness. No weird aftertaste (I promise).
Swap #2: Skip the Cornstarch
Restaurants coat the beef in cornstarch, then use more to thicken the sauce.
My version? No coating at all. And I use xanthan gum for thickening instead. Just a tiny bit creates that glossy, restaurant-style consistency.
Swap #3: Cauliflower Rice
This one’s obvious but essential. Cauliflower rice soaks up all that delicious sauce without adding carbs.
I’ll show you my favorite way to make it later in this article.
The result?
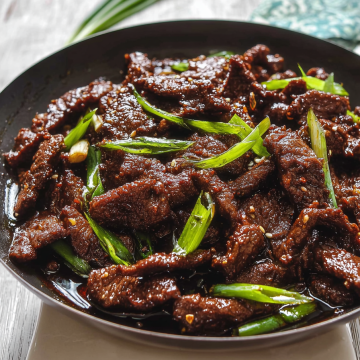
A dish that tastes exactly like what you’d get at PF Chang’s. The sauce clings to every piece of beef. Sweet meets savory. There’s just enough heat to keep things interesting.
And your macros stay intact.
Let’s Talk About the Steak
Most recipes demand flank steak. And sure, it works great.
But can I let you in on a secret?
Flatiron steak is better.
It’s cheaper. More tender. Easier to find at regular grocery stores.
I discovered this by accident when my store was out of flank steak. Now I actually prefer it. The texture is just… better. More buttery, if that makes sense.
Can’t find flatiron? Sirloin works too. Just make sure you can slice it thin.
Soy Sauce vs. Coconut Aminos (And Why It Matters)
I get asked about this constantly.
Here’s the deal. Regular soy sauce has fewer carbs than coconut aminos. Zero versus about 1g per tablespoon.
So if you’re strict about carbs? Stick with soy sauce.
But.
If you’re avoiding soy or gluten, coconut aminos work perfectly fine. The flavor is slightly sweeter and less intense. I’ve made this recipe both ways—both are delicious.
Your choice depends on your priorities.
The Freezer-Friendly Hack Nobody Talks About
This is my favorite part.
I make double batches and freeze half. Throw everything (except the green onions) into a freezer bag. Lay it flat. Freeze it.
Three months later? You’ve got keto takeout ready to go.
Just thaw overnight and cook as normal.
This has saved me so many times. Those nights when I’m tired and tempted to order actual takeout? I’ve got this waiting in the freezer instead.
It’s like meal prep without the meal prep stress.
Here’s Exactly How to Make It
Let me break down every single step. No confusing instructions. Just clear, simple directions.
What You’ll Need
| Ingredient | Quantity | Notes |
|---|---|---|
| Avocado oil | 1 tablespoon | For cooking the sauce |
| Fresh ginger | 2 teaspoons, minced | Don’t use dried—fresh is essential |
| Fresh garlic | 1 tablespoon, minced | About 3-4 cloves |
| Soy sauce | ½ cup | Low sodium preferred; or coconut aminos |
| Water | ½ cup | For the sauce base |
| Sugar-free sweetener | ¾ cup | Granulated erythritol blend works best |
| Flank or flatiron steak | 1½ pounds | Sliced thin against the grain |
| Red pepper flakes | ¼ teaspoon | Adjust based on heat preference |
| Green onions | 5 stems | Cut diagonally into 2-inch pieces |
| Xanthan gum | ¼ teaspoon | Essential for sauce thickening |
Step 1: Build Your Sauce
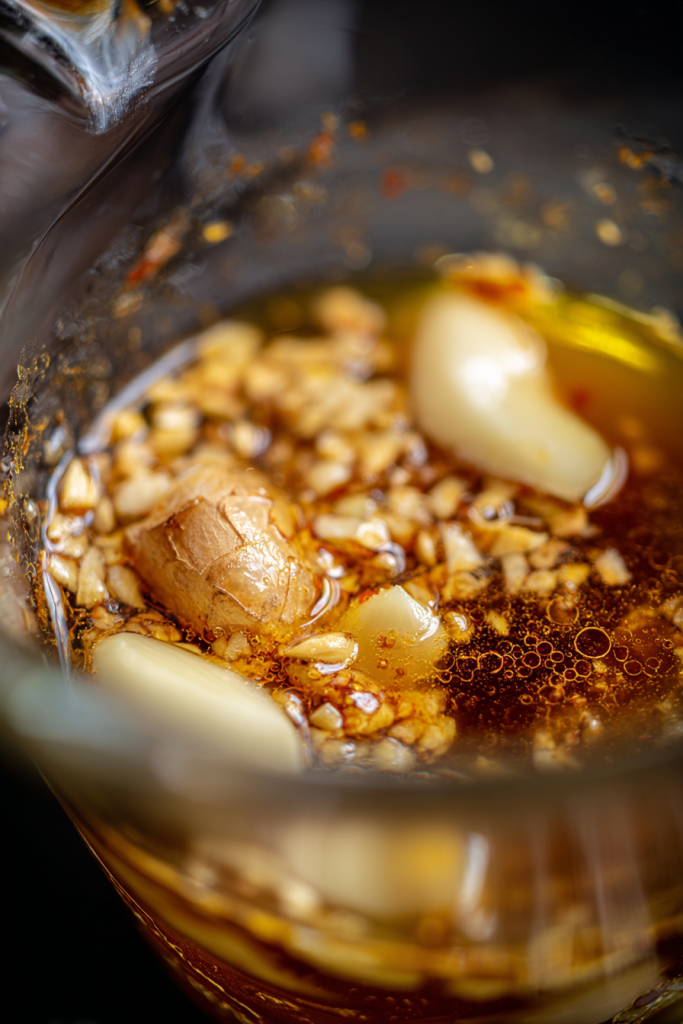
Warm up your avocado oil in a medium saucepan. Medium heat. You want it warm—not smoking.
Toss in the ginger, garlic, and red pepper flakes.
Stir constantly for 30 seconds. Maybe less. Your kitchen will smell amazing right about now.
Watch the garlic carefully. If it browns, it’ll taste bitter. We don’t want that.
Now pour in the soy sauce, water, and sweetener. Whisk everything together.
Crank up the heat. Bring it to a rolling boil.
Once it’s boiling? Drop it to a simmer.
Let it bubble away for 5 minutes. You’ll see it thicken slightly and reduce down. That’s exactly what you want—all those flavors concentrating.
Transfer the sauce to a bowl. Set it aside.
Don’t skip this step. You need your pan free for the beef.
Step 2: Slice and Cook the Beef
This is where technique matters.
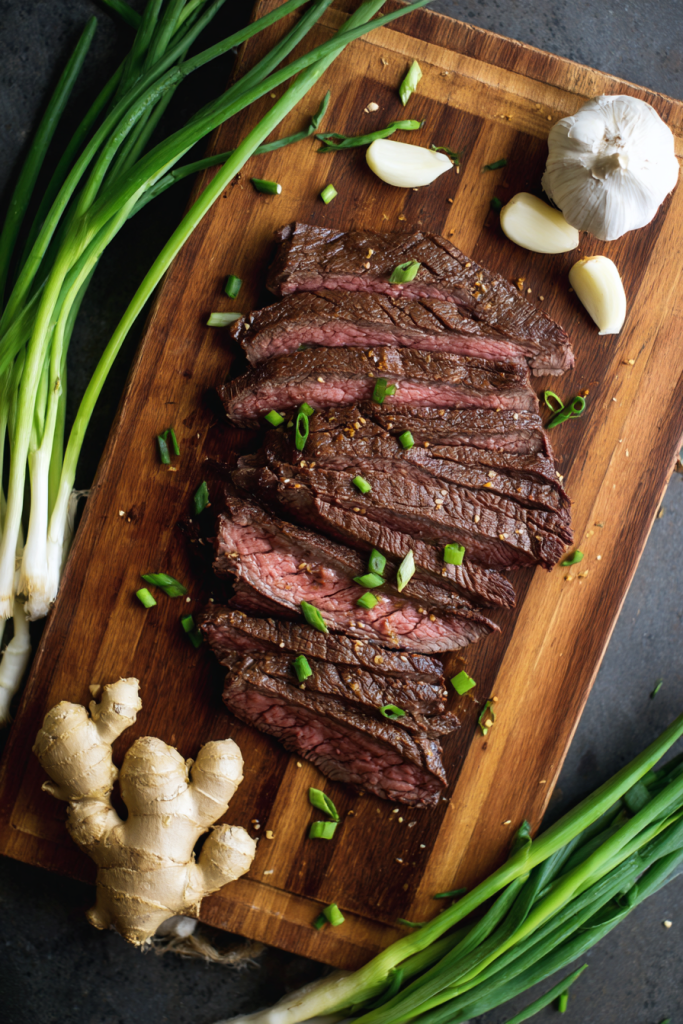
Take your steak. Slice it against the grain into ¼-inch strips.
Hold your knife at a 45-degree angle. This creates those classic restaurant-style pieces.
Got some really long strips? Cut them in half. You want bite-sized pieces.
The thinner you slice, the more tender your final dish will be.
Now heat your skillet over medium-high. Get it hot.
Add a little more avocado oil if you need to.
Here’s the key: don’t overcrowd the pan.
Work in batches. I know it’s annoying. But if you dump all the beef in at once, it steams instead of browns.
And we want that brown crust.
Place your beef strips in a single layer. Leave them alone for 2-3 minutes on the first side. No poking. No stirring.
You should see nice browning.
Flip each piece. Cook another minute or two.
Remove the first batch to a plate. Repeat with the rest of your beef.
Yes, it takes longer. But trust me—it’s worth it.
Step 3: Bring It All Together
All your beef is cooked? Perfect.
Drop the heat to medium.
Pour that reserved sauce back into the skillet with the beef.
Now for the magic trick.
Sprinkle the xanthan gum directly into the sauce. Stir constantly as you do this.
This prevents clumping. Nobody wants sauce with weird lumps.
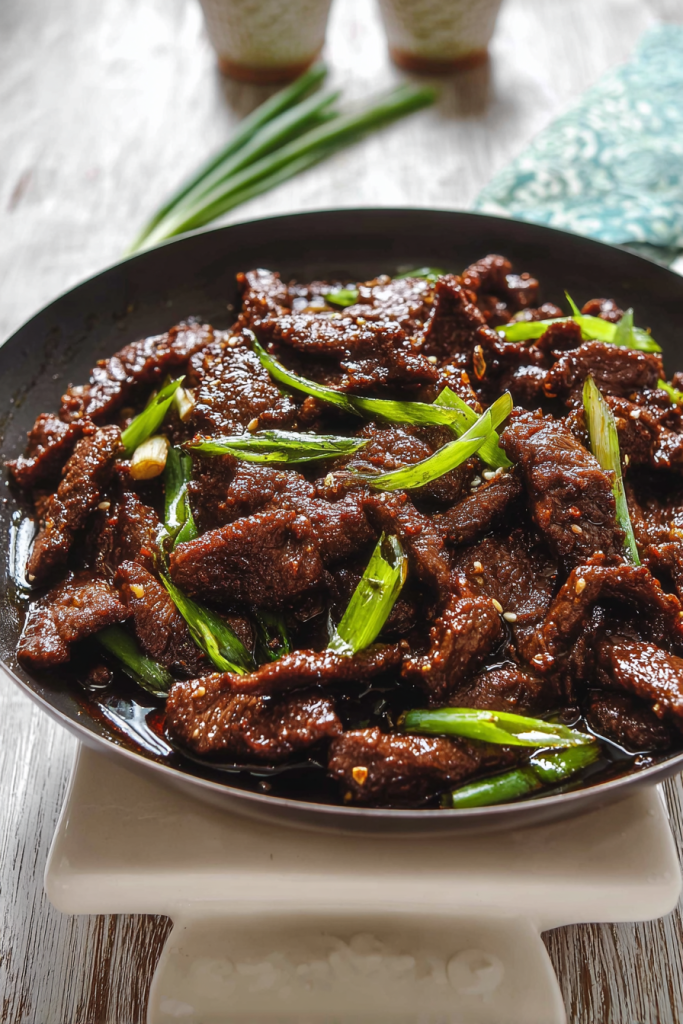
Watch what happens. The sauce transforms almost immediately. It gets thick. Glossy. Exactly like takeout.
Keep stirring for 2-3 minutes.
Every piece of beef should be completely coated in that beautiful sauce.
Toss in your green onions at the very end. They should stay crisp and bright green.
Remove from heat immediately.
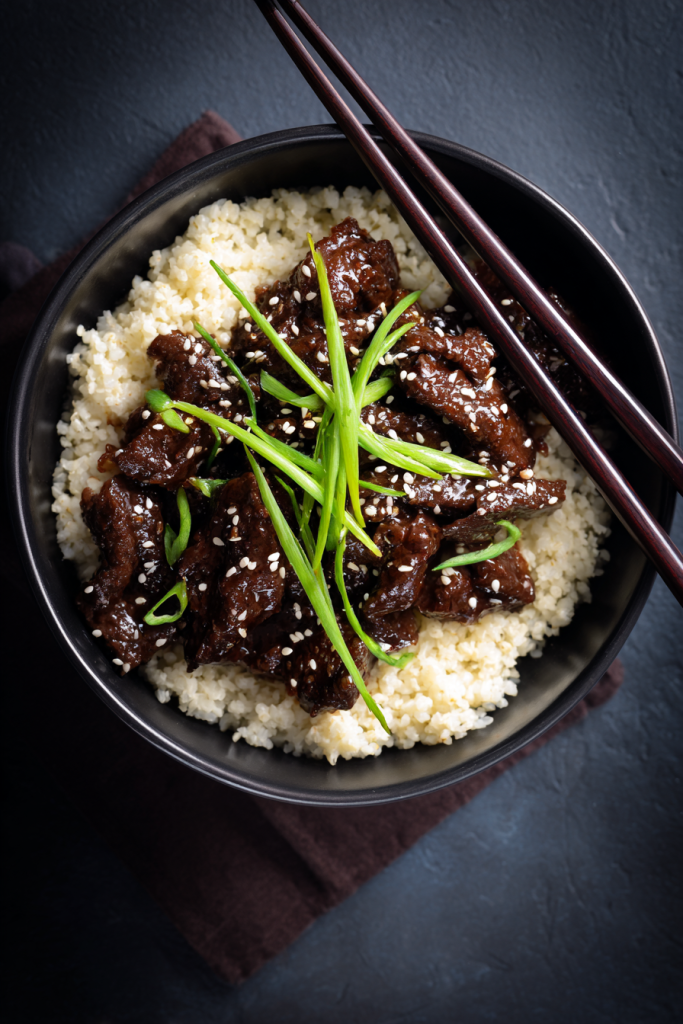
How I Serve It (And You Should Too)
Cauliflower rice is non-negotiable for me.
Here’s how I make it:
Pulse cauliflower florets in a food processor until they’re rice-sized. Don’t over-process or you’ll get mush.
Sauté in a hot skillet with oil and salt for 4-5 minutes.
That’s it.
The cauliflower soaks up all that sauce. Honestly? I think I like it better than regular rice now. It’s lighter. Doesn’t make you feel stuffed.
Other options that work:
- Zucchini noodles
- Shirataki noodles
- Roasted broccoli
- Just eat it straight (no judgment)
The Mistakes I Made So You Don’t Have To
Mistake #1: Cooking on too-low heat
Your beef needs HIGH heat. Otherwise it won’t brown properly. You’ll get gray, steamed beef instead of that caramelized crust.
Not good.
Mistake #2: Skipping the batch cooking
I tried cooking all the beef at once. Just once. Never again.
Overcrowded beef steams. It doesn’t sear. The texture is all wrong.
Do the batches. I promise it matters.
Mistake #3: Adding too much xanthan gum
More isn’t better here. A little goes a long way.
I learned this the hard way. Used too much once and ended up with basically beef-flavored jello.
Stick with the ¼ teaspoon.
Mistake #4: Not tasting before serving
Always taste your sauce before plating. Everyone’s sweetener tolerance is different.
Need more sweetness? Add a tiny pinch more.
Want more heat? Extra red pepper flakes fix that fast.
What About Leftovers?
They’re actually better the next day.
Store in an airtight container in your fridge. Keeps for 3-4 days easy.
The flavors deepen overnight. Day-two lunch is honestly incredible.
To reheat: Use a skillet over medium heat with a splash of water. This keeps the sauce from getting too thick.
Microwave works too. But the texture won’t be quite as good.
Your Questions Answered
“Can I make this without xanthan gum?”
Yeah, but your sauce won’t be as thick.
Try arrowroot powder mixed with cold water instead. Fair warning—it adds a few carbs.
Or just let the sauce reduce more during the initial cooking. It’ll thicken naturally through evaporation. Takes longer, but it works.
“Is coconut aminos really that different from soy sauce?”
Similar but not identical.
Coconut aminos taste sweeter and less salty. They also pack more carbs—about 1g per tablespoon versus zero for soy sauce.
| Comparison | Soy Sauce | Coconut Aminos |
|---|---|---|
| Carbs per tbsp | 0g | 1g |
| Flavor profile | Salty, umami | Sweet, mild |
| Gluten-free | No (usually) | Yes |
| Soy-free | No | Yes |
If carbs are your main concern? Soy sauce wins.
Need gluten-free or soy-free? Go with coconut aminos.
“Why does my beef turn out tough?”
Two reasons, usually.
First: You sliced with the grain instead of against it. Always slice against the grain. This shortens the muscle fibers and makes the meat tender.
Second: You overcooked it. Beef keeps cooking even after you take it off the heat.
Aim for just-brown on the outside. It’ll finish cooking when you add it back with the sauce.
“Can I use a different sweetener?”
Most granulated sweeteners work fine.
I prefer erythritol blends because they measure exactly like sugar. Easy conversion.
Avoid liquid sweeteners. They mess up the sauce consistency.
Using monk fruit alone? Cut the amount by about one-third. It’s sweeter than erythritol.
“What if I don’t have flank or flatiron steak?”
Options that work well:
- Sirloin steak
- Skirt steak
- Ribeye (if you’re feeling fancy)
Just make sure you can slice it thin.
Avoid tougher cuts like chuck roast. They need hours of slow cooking to get tender.
Final Thoughts (From My Kitchen to Yours)
This recipe changed my keto game.
I make it at least once a week now. Sometimes twice if I’m meal prepping.
It satisfies those takeout cravings without destroying my progress. And honestly? It’s actually fun to make.
The first time takes some focus. By the third time? You’ll be doing it without even looking at the recipe.
Last week I made it on a Tuesday night after work. Took me 23 minutes from start to finish. Had dinner on the table before my husband even finished his Zoom call.
That’s the beauty of this recipe. It’s fast. It’s delicious. And it works.
So give it a try tonight.
I think you’ll be shocked at how close it tastes to restaurant quality. Maybe even better, because you made it yourself.
And isn’t that the whole point?
Nutrition Information (per serving):
| Nutrient | Amount |
|---|---|
| Calories | 331 |
| Total Carbs | 6g |
| Fiber | 1g |
| Net Carbs | 5g |
| Protein | 40g |
| Fat | 17g |
Note: Nutrition information is calculated for the Mongolian beef only and does not include cauliflower rice or other side dishes.
Keto Mongolian Beef
Ingredients
For the Sauce
- 1 tablespoon avocado oil for cooking the sauce
- 2 teaspoons fresh ginger minced
- 1 tablespoon fresh garlic minced (about 3-4 cloves)
- 1/2 cup soy sauce low sodium preferred, or coconut aminos
- 1/2 cup water
- 3/4 cup sugar-free sweetener granulated erythritol blend works best
- 1/4 teaspoon red pepper flakes adjust based on heat preference
- 1/4 teaspoon xanthan gum essential for sauce thickening
For the Beef
- 1 1/2 pounds flank or flatiron steak sliced thin against the grain
- 1 tablespoon avocado oil for cooking the beef
For Garnish
- 5 green onions cut diagonally into 2-inch pieces
Instructions
Build the Sauce
- Heat avocado oil in a medium saucepan over medium heat.
- Add ginger, garlic, and red pepper flakes. Stir constantly for 30 seconds until fragrant. Watch the garlic carefully to prevent browning.
- Pour in soy sauce, water, and sweetener. Whisk everything together.
- Increase heat and bring to a rolling boil, then reduce to a simmer.
- Let simmer for 5 minutes until sauce thickens slightly and reduces. Transfer sauce to a bowl and set aside.
Cook the Beef
- Slice steak against the grain into 1/4-inch strips at a 45-degree angle. Cut long strips in half for bite-sized pieces.
- Heat a skillet over medium-high heat. Add avocado oil.
- Working in batches to avoid overcrowding, place beef strips in a single layer. Cook for 2-3 minutes without stirring until browned.
- Flip each piece and cook another 1-2 minutes. Remove to a plate and repeat with remaining beef.
Combine and Finish
- Reduce heat to medium. Return all cooked beef to the skillet.
- Pour reserved sauce over the beef. Sprinkle xanthan gum directly into the sauce while stirring constantly to prevent clumping.
- Continue stirring for 2-3 minutes until sauce becomes thick and glossy, coating every piece of beef.
- Add green onions and toss to combine. Remove from heat immediately.
- Serve over cauliflower rice, zucchini noodles, or shirataki noodles.