Look, I make this Mexican Cauliflower Rice at least twice a month.
Maybe more.
It’s one of those dinners I reach for when I’m tired, hungry, and absolutely not in the mood to slave over the stove for hours.
Here’s the funny part. This whole thing started because I had leftover cauliflower sitting in my fridge. I threw it together with some ground beef and taco seasoning, hoping for the best.
Now? My pickiest kid asks for it by name.
That’s how good this is.

Why This Recipe Actually Works
Mexican food hits different, right?
This dish captures everything I crave. Seasoned beef. Tender veggies. That gooey melted cheese on top.
But here’s what I really love:
Everything cooks in one skillet.
I start by browning the meat. This builds flavor from the ground up. Then the veggies go in. Finally, the cauliflower rice soaks up all those amazing pan juices.
Using cauliflower instead of regular rice? Total game changer.
Wait, scratch that. Let me rephrase.
Using cauliflower keeps things lighter. You still get that hearty, filling feeling. But you’re not weighed down afterward. Plus, you’re sneaking in extra veggies without even trying.
Perfect for those crazy weeknights when dinner needs to happen fast.
What Makes This Different
I’ve made my fair share of one-pan meals.
Some were decent. Others went straight to the trash.
This one? It never disappoints. The taco seasoning coats every single ingredient. Nothing tastes bland or boring.
The cooking order matters too.
Beef goes in first. Gets that nice brown crust. Then vegetables. They soften up just enough before the cauliflower joins the party.
And that cheese at the end?
*Chef’s kiss*
It melts into this creamy layer that pulls everything together. Simple ingredients become something your family will actually get excited about.
Perfect for Meal Prep
Want to know my Sunday night secret?
I double this recipe.
The leftovers taste incredible reheated. I’m talking just-as-good-as-fresh incredible. Pack them in individual containers and boom – you’ve got lunch for the entire week.
Here’s the cool part.
The flavors actually get better after sitting in the fridge overnight. All those seasonings have time to mingle and get cozy.
But this recipe doesn’t stop at dinner. I’ve used it for:
• Lettuce wrap filling
• Loaded nacho topping
• Mixed into scrambled eggs for a killer breakfast
Talk about versatile.
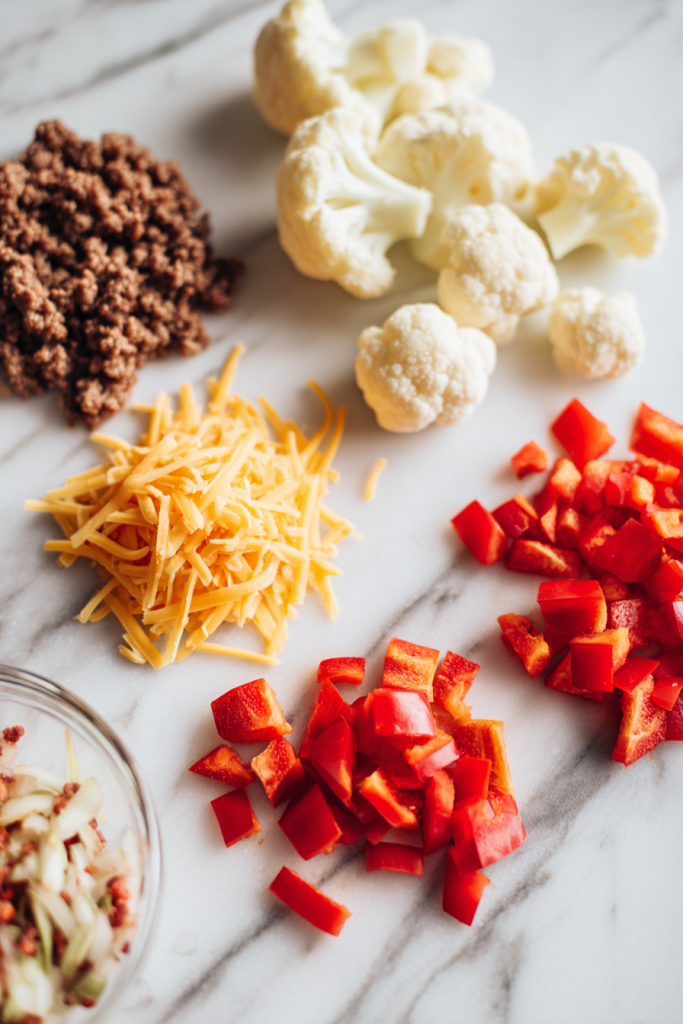
What You’ll Need
I’ve played around with this recipe more times than I can count.
Different ingredients. Various substitutions. You name it, I’ve tried it.
Here’s what works best:
| Ingredient | Quantity | Notes |
| Ground beef | 1 1/3 lb (604.79 g) | Lean if possible |
| Onion, diced | 1/4 cup (40 g) | Yellow or white |
| Red pepper, diced | 1/2 medium | Green or yellow works too |
| Taco seasoning | 3 tbsp (7.61 g) | Homemade or store-bought |
| Salt and pepper | To taste | Adjust after tasting |
| Diced tomatoes | 1 cup (149 g) | Fresh or canned, drained |
| Cauliflower rice | 16 oz (453.59 g) | Fresh or frozen both work |
| Chicken broth | 1/2 cup (118.29 ml) | Low sodium preferred |
| Shredded cheddar cheese | 1 cup (113 g) | Sharp cheddar recommended |
Prep Time: 10 minutes | Cook Time: 15 minutes | Total Time: 25 minutes
Servings: 4 | Difficulty: Easy
Let’s Talk Ingredients
Ground Beef
I go for lean ground beef. Less grease to deal with.
But listen. Ground turkey or chicken? Both work great if you want something lighter. Just cook them all the way through. No pink allowed.
The Veggies
That little bit of onion? It adds so much depth.
Red peppers bring sweetness and make everything look prettier. But honestly, any bell pepper works. Green. Yellow. Orange. I sometimes mix half red and half green just for fun.
Taco Seasoning
Store-bought packets are my go-to on busy nights.
But if you’re picky about ingredients? Make your own. You control the salt. You avoid weird fillers and added sugars.
Tomatoes
Fresh tomatoes taste amazing. Bright. Vibrant.
Canned tomatoes? Super convenient. Either way, drain that excess liquid. Nobody wants watery cauliflower rice.
Cauliflower Rice
Fresh or frozen – doesn’t matter.
They cook in the same amount of time. Frozen releases a tiny bit more water, but it’s not a dealbreaker.
Buy it pre-riced from the store. Or make your own by tossing cauliflower florets in a food processor. Easy.
The Cheese
Sharp cheddar is my favorite. Melts beautifully. Packs serious flavor.
But Monterey Jack? Pepper jack? Mexican cheese blend? All winners.
Pro tip: Shred your cheese from a block. Pre-shredded stuff has coating that prevents good melting.
How to Make It
Step 1: Brown the Beef
Grab your large skillet. Heat it over medium.
Toss in the ground beef. Break it apart with a wooden spoon. Cook for 5-6 minutes until it’s mostly brown with just a little pink left.
Why brown it first?
Because those caramelized bits stuck to the pan? Pure gold. They add richness to everything.
Step 2: Vegetables Join the Party
Add your diced onion and red pepper.
Keep cooking. Stir every now and then. The vegetables will soften and the beef will finish cooking. Takes about 3-4 minutes.
The veggies release moisture here. That liquid helps pick up all those tasty browned bits from the bottom of the pan.
Step 3: Season Everything
Sprinkle that taco seasoning over everything.
Stir it in really well. You want every bit coated.
Now taste a tiny bit. Need salt? Add it. But go easy.
Most taco seasonings are already loaded with salt. Trust me on this one.

Step 4: In Goes the Good Stuff
Pour in those diced tomatoes. Add the cauliflower rice. Mix it all together.
Now add the chicken broth. Stir.
Let everything come to a gentle simmer. The broth helps the cauliflower cook evenly. It also stops things from sticking.
Step 5: Let It Cook
Turn the heat down to medium-low.
Cover your skillet. Let it cook for 8-10 minutes.
The cauliflower should get tender. But not mushy. Never mushy.
Give it a stir every few minutes. The cauliflower soaks up all those wonderful flavors as it softens.
Step 6: Cheese Time
This is my favorite part.
Scatter that shredded cheddar all over the top. Cover the skillet again.
Cook for 3-4 minutes. Just until the cheese melts completely.
That melted cheese creates this creamy layer that holds everything together. Simple ingredients suddenly taste special.
Step 7: Serve It Up
Take it off the heat. Serve right away.
Top with whatever makes you happy. Sour cream. Fresh cilantro. Diced avocado. A good squeeze of lime.
My Best Tips
Get a Big Skillet
You need at least a 12-inch skillet for this.
I learned this the hard way. Smaller pans? Everything crowds together. Can’t stir properly. Cooks unevenly.
Give your ingredients room to breathe.
Actually Brown the Beef
Don’t rush this step.
Properly browning the beef builds deeper flavor. Those caramelized bits? They make a huge difference in the final taste.
Drain That Fat
After browning, I sometimes spoon off excess grease.
Not required. But it keeps the dish from feeling too heavy. Makes a noticeable difference in how you feel after eating.
Watch the Cauliflower
Frozen cauliflower rice releases more water as it cooks.
If things look too wet? Take the lid off. Cook for another minute or two. Let that excess liquid evaporate.
Taste First
Different taco seasonings have wildly different salt levels.
Always taste after adding the seasoning. Then decide if you need more salt.
You can add salt. You can’t take it away.

How to Serve This
This works as a complete meal all by itself.
You’ve got protein. Veggies. Cheese. Everything you need.
But toppings? They take this to the next level.
Here’s what I reach for:
- Sour cream – adds cooling creaminess
- Fresh salsa or pico de gallo – brings brightness
- Diced avocado or guacamole – healthy fats
- Chopped cilantro – fresh herbaceous notes
- Sliced green onions – mild onion flavor
- Hot sauce – for those who like heat
- Pickled jalapeños – tangy and spicy
- Lime wedges – that citrus squeeze makes everything pop
The best part?
Everyone can customize their own portion. My husband loads his up with hot sauce. My kids keep it simple with just cheese and sour cream.
Everyone’s happy.
Storing and Reheating
Leftovers keep great in airtight containers.
Store them in the fridge for up to 5 days. The flavors actually get better after sitting overnight.
To reheat:
Microwave for 2-3 minutes. Stir halfway through.
Seems dry? Add a splash of water or broth.
Stovetop works too. Just heat in a skillet over medium-low until warmed through.
Freezing:
This freezes like a champ.
Portion into freezer-safe containers. Freeze for up to 3 months. Thaw overnight in the fridge before reheating.
Questions You Might Have
Can I use ground turkey or chicken instead of beef?
Yes! Both work great.
You’ll get a lighter version with all the same flavor. Just cook them exactly like the beef. Make sure they’re cooked all the way through.
What if I don’t have taco seasoning?
No problem. Make your own.
Mix together:
• 1 tablespoon chili powder
• 1 teaspoon cumin
• 1 teaspoon paprika
• 1/2 teaspoon garlic powder
• 1/2 teaspoon onion powder
• A pinch of oregano
Add salt to taste. Done.
Is this recipe spicy?
Not really.
Most taco seasonings are pretty mild. More flavor than heat.
Want it spicy? Add cayenne pepper to your seasoning. Or top with jalapeños and hot sauce.
Can I make this vegetarian?
Absolutely.
Swap the ground beef for black beans or pinto beans. Crumbled tempeh works too. So does plant-based ground meat.
Just skip that initial browning step if you’re using beans.
How do I keep the cauliflower from getting mushy?
Watch the clock.
Cauliflower rice cooks fast. Overcook it and you’ve got mush.
Start checking at 8 minutes. It should be tender with a slight bite. Not soft. Not falling apart.
So there you have it.
This Mexican Cauliflower Rice has seriously earned its spot in my weekly dinner lineup. It’s quick. It’s satisfying. And it’s flexible enough that everyone in my house will actually eat it.
Give it a shot.
I’m betting it becomes your new go-to weeknight dinner too.

Mexican Cauliflower Rice
Ingredients
- 1 1/3 lb ground beef 604.79 g, lean if possible
- 1/4 cup diced onion 40 g, yellow or white
- 1/2 medium red pepper diced (green or yellow works too)
- 3 tbsp taco seasoning 7.61 g, homemade or store-bought
- Salt and pepper to taste
- 1 cup diced tomatoes 149 g, fresh or canned, drained
- 16 oz cauliflower rice 453.59 g, fresh or frozen
- 1/2 cup chicken broth 118.29 ml, low sodium preferred
- 1 cup shredded cheddar cheese 113 g, sharp cheddar recommended
Instructions
- Heat a large 12-inch skillet over medium heat. Add ground beef and break apart with a wooden spoon. Cook for 5-6 minutes until mostly brown with just a little pink left.
- Add diced onion and red pepper to the skillet. Continue cooking for 3-4 minutes, stirring occasionally, until vegetables soften and beef is fully cooked.
- Sprinkle taco seasoning over the beef mixture and stir well to coat everything. Taste and adjust salt if needed (go easy – most taco seasonings already contain salt).
- Add diced tomatoes and cauliflower rice to the skillet. Pour in chicken broth and stir to combine. Bring to a gentle simmer.
- Reduce heat to medium-low and cover the skillet. Cook for 8-10 minutes, stirring occasionally, until cauliflower is tender but not mushy.
- Scatter shredded cheddar cheese evenly over the top. Cover again and cook for 3-4 minutes until cheese is completely melted.
- Remove from heat and serve immediately. Top with optional toppings like sour cream, fresh cilantro, diced avocado, or lime wedges.
Notes
Make It Spicy: Add cayenne pepper to the seasoning or top with jalapeños and hot sauce.
Vegetarian Option: Replace ground beef with black beans, pinto beans, or plant-based ground meat.
Homemade Taco Seasoning: Mix 1 tbsp chili powder, 1 tsp cumin, 1 tsp paprika, 1/2 tsp garlic powder, 1/2 tsp onion powder, pinch of oregano, and salt to taste.
Storage: Store leftovers in airtight containers in the fridge for up to 5 days. Flavors improve overnight.
Reheating: Microwave for 2-3 minutes, stirring halfway. Add a splash of water or broth if needed. Can also reheat in a skillet over medium-low heat.
Freezing: Freezes well for up to 3 months. Thaw overnight in fridge before reheating.
Avoid Mushy Cauliflower: Start checking at 8 minutes. It should be tender with a slight bite, not soft or falling apart.
Drain Excess Fat: After browning beef, spoon off excess grease to keep the dish lighter.
Claude is AI and can make mistakes. Please double-check responses.