When I first discovered pepperoni pizza roll-ups, I knew I had stumbled upon something special. As someone who’s always looking for ways to enjoy my favorite comfort foods without the guilt, these roll-ups have become my go-to solution for pizza cravings. They deliver all the familiar flavors we love about pizza – that perfect combination of melted cheese, savory pepperoni, and aromatic herbs – but in a completely new, satisfying format.
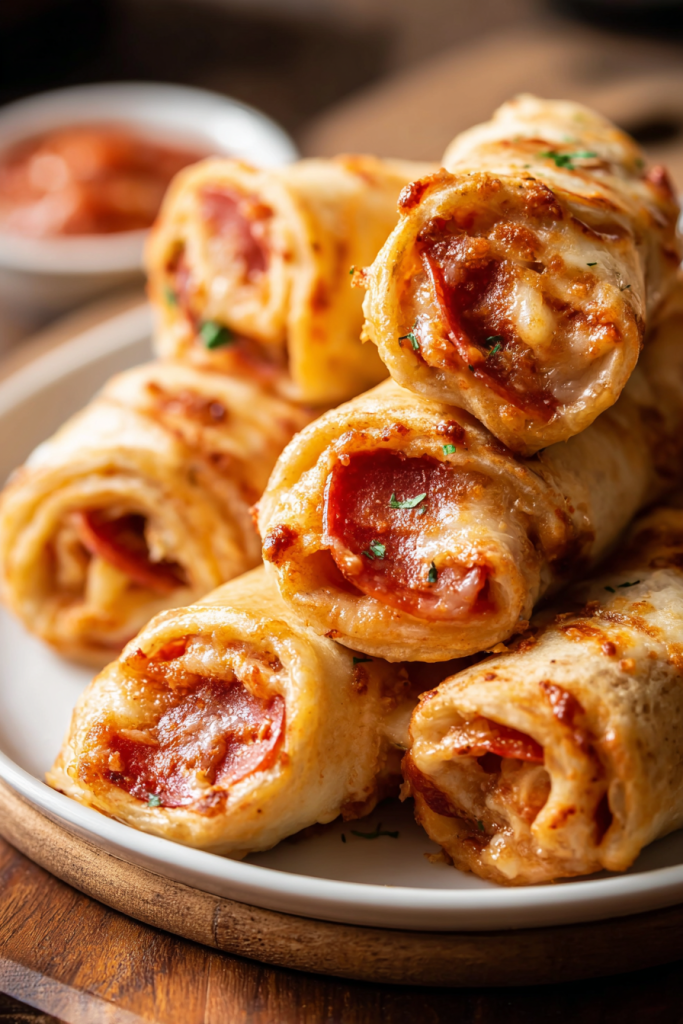
What makes these pepperoni pizza roll-ups truly extraordinary is their versatility and simplicity. I’ve served them as appetizers at dinner parties, packed them for lunch, and even made them as a quick weeknight dinner when I needed something both comforting and relatively healthy. The beauty lies in how they capture the essence of pizza without requiring any dough preparation or lengthy rising times.
The magic happens when the cream cheese base meets the melted mozzarella, creating this incredibly creamy, rich foundation that holds everything together beautifully. I’ve experimented with various combinations over the years, but this particular recipe strikes the perfect balance between indulgence and practicality. The oregano and garlic powder add those classic Italian flavors that transport you straight to your favorite pizzeria, while the fresh basil provides a bright, aromatic finish that elevates the entire dish.
Recipe Timing
Prep Time: 10 minutes | Cook Time: 15 minutes | Total Time: 25 minutes
Servings: 4 | Difficulty: Easy
Ingredients Table
| Ingredient | Quantity | Notes |
|---|---|---|
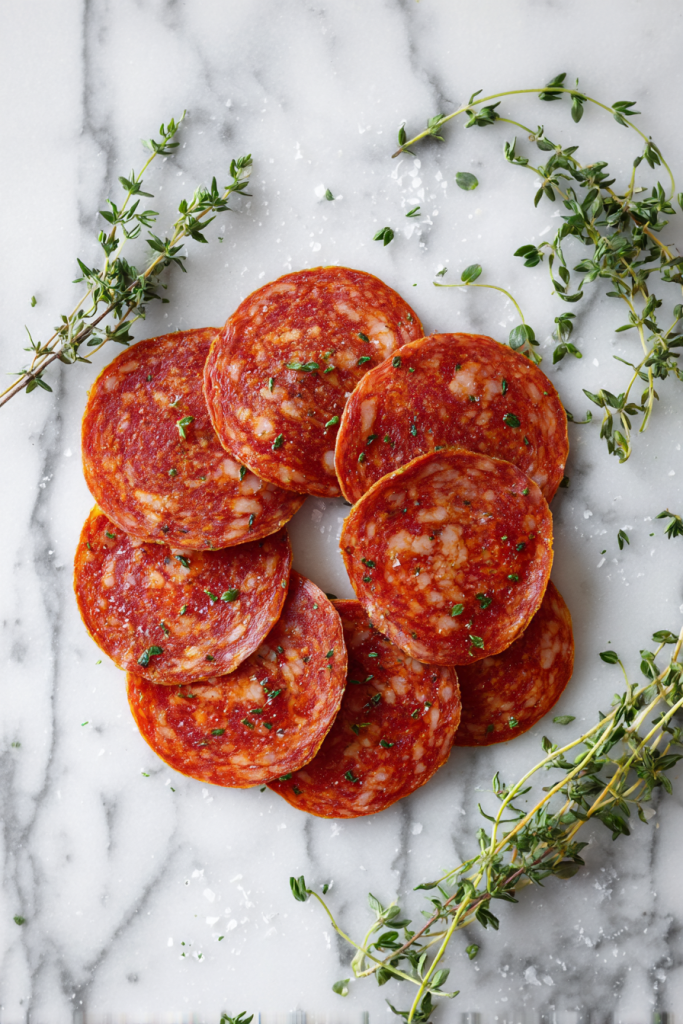
| Pepperoni slices | 8 slices | Choose thick-cut for better texture |
| Cream cheese | 4 oz, softened | Must be at room temperature |
| Mozzarella cheese | 1 cup, shredded | Fresh mozzarella works too |
| Marinara sauce | 1/2 cup | Low-carb variety preferred |
| Dried oregano | 1 teaspoon | Crush between fingers for more flavor |
| Garlic powder | 1 teaspoon | Fresh minced garlic can substitute |
| Fresh basil | 1 tablespoon, chopped | Optional but highly recommended |
| Salt and pepper | To taste | Start with 1/4 teaspoon each |
| Fresh parsley | For garnish | Optional, adds color and freshness |
The ingredient list might look simple, but each component plays a crucial role in creating the perfect bite. I’ve learned through trial and error that using softened cream cheese is absolutely essential – cold cream cheese simply won’t blend properly with the other ingredients, leaving you with lumpy, uneven filling. The marinara sauce adds that classic pizza tang, but be careful not to use too much, as it can make the roll-ups soggy.
Pro tip: I always taste my marinara sauce before using it in this recipe. Some store-bought varieties can be quite salty, so you might need to adjust your salt and pepper accordingly. Also, if you can find a low-carb marinara sauce, it’s definitely worth the extra cost for the reduced sugar content.
Step-by-Step Instructions
Now that we have all our ingredients prepped and ready, let’s dive into the actual preparation process. I’ve refined this method over countless batches, and I can promise that following these steps will give you consistently delicious results every time.
Step 1: Prepare the Cream Cheese Base
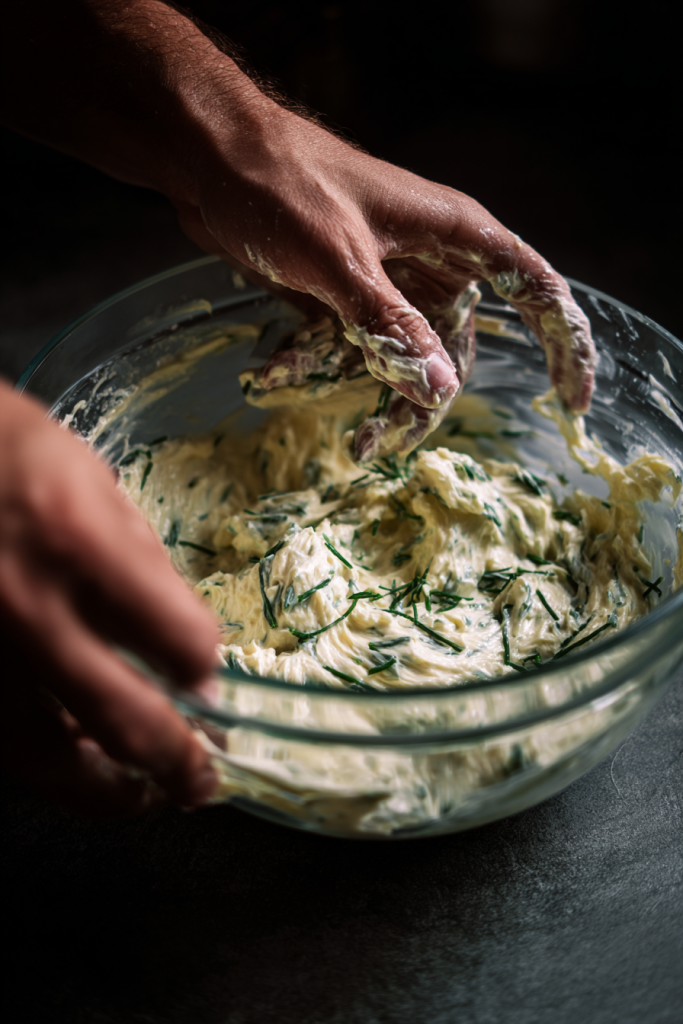
The foundation of these roll-ups starts with creating the perfect cheese mixture. In a medium mixing bowl, combine your softened cream cheese with the shredded mozzarella. I use a fork to mash and blend them together initially, then switch to a wooden spoon for the final mixing. The goal is to create a smooth, cohesive mixture that spreads easily.
Add the oregano and garlic powder to the cheese mixture, then season with salt and pepper. I typically start with about 1/4 teaspoon of each and adjust from there. Mix everything thoroughly until the herbs are evenly distributed throughout the cheese base. This mixture should be creamy and spreadable – if it seems too thick, you can let the cream cheese soften a bit more at room temperature.
Step 2: Prepare Your Work Surface
I always lay out a large piece of parchment paper on my counter when making these roll-ups. It makes cleanup so much easier and provides a clean surface for assembly. Have your pepperoni slices ready and your marinara sauce in a small bowl with a spoon for easy drizzling.
Step 3: Assembly Process
Here’s where the magic happens, and honestly, this is my favorite part of the entire process. Take about 2-3 tablespoons of your cheese mixture and spread it out on the parchment paper into a rectangle roughly 6×4 inches. The thickness should be about 1/4 inch – thick enough to hold everything together but not so thick that it becomes unwieldy.
Arrange 2 slices of pepperoni on one end of your cheese rectangle, leaving about an inch border. Drizzle approximately 1 tablespoon of marinara sauce over the pepperoni, being careful not to use too much. If you’re using fresh basil, sprinkle a few chopped leaves over the sauce now.
Step 4: The Rolling Technique
This step requires a gentle touch, but don’t worry – even if your first roll-up isn’t picture-perfect, it’ll still taste amazing. Starting from the pepperoni end, carefully lift the cheese mixture and begin rolling it away from you. Use the parchment paper to help guide the roll, but try not to get the paper caught inside the roll-up.
The cheese mixture should naturally want to stick to itself as you roll. If it seems too soft to hold its shape, pop it in the refrigerator for 10-15 minutes to firm up before continuing. Repeat this process with the remaining ingredients to create 4 roll-ups total.
Step 5: The Final Cooking Step
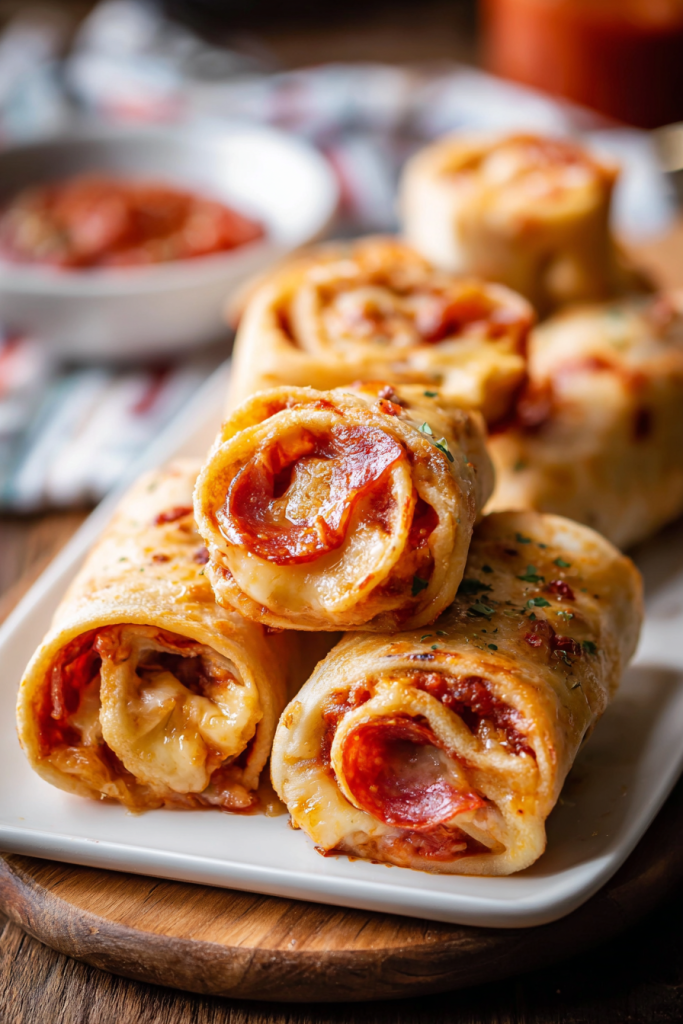
Preheat your oven to 375°F (190°C). Place your completed roll-ups on a parchment-lined baking sheet, seam-side down. This is crucial – you want gravity to help keep them closed during baking.
Bake for 12-15 minutes, until the cheese is bubbling and the edges are lightly golden. I usually check them at the 10-minute mark to make sure they’re not browning too quickly. The roll-ups are done when they feel firm to the touch and have developed a lovely golden color on the outside.
Pro Tips for Perfect Results
Through my many attempts at perfecting this recipe, I’ve discovered several tricks that make all the difference. First, don’t skip the resting period after baking – let the roll-ups cool for about 5 minutes before cutting. This allows the cheese to set slightly, making them much easier to slice cleanly.
Second, I always keep a damp towel nearby while assembling. The cheese mixture can get a bit sticky on your hands, and having a quick way to clean them between roll-ups keeps the process smooth and hygienic.
Finally, if you’re making these for a party or meal prep, they actually reheat beautifully. I store them in the refrigerator for up to 3 days and warm them in a 350°F oven for about 8-10 minutes when ready to serve.
Serving Suggestions
These pepperoni pizza roll-ups are incredibly versatile when it comes to serving options. I love them as a standalone appetizer – just slice each roll-up into 3-4 pieces and arrange them on a platter with some extra marinara sauce for dipping. The presentation is always impressive, and guests are usually amazed when they learn how simple they are to make.
For a more substantial meal, I often serve them alongside a crisp Caesar salad or some roasted vegetables. The richness of the cheese pairs beautifully with bitter greens like arugula or spinach. I’ve also discovered that they make an excellent lunch option – I’ll often make a batch on Sunday and portion them out for the week ahead.
Creative Variations
One of the things I love most about this recipe is how easily it adapts to different flavor profiles. I’ve created several variations that have become family favorites:
Mediterranean Style: Replace the pepperoni with sun-dried tomatoes, add some crumbled feta to the cheese mixture, and include fresh spinach leaves. The result is bright, tangy, and incredibly satisfying.
Spicy Italian: Add a pinch of red pepper flakes to the cheese mixture and use spicy pepperoni. I sometimes include a few sliced jalapeños for extra heat.
Veggie Lovers: Skip the pepperoni entirely and load up with roasted bell peppers, mushrooms, and zucchini. This version is lighter but still incredibly flavorful.
Breakfast Version: Use cooked bacon instead of pepperoni and add a sprinkle of everything bagel seasoning to the cheese mixture. These make an fantastic brunch item.
Storage and Meal Prep
These roll-ups are fantastic for meal prep. I often make a double batch and store them in individual containers in the refrigerator. They keep well for up to 4 days and reheat perfectly in the microwave (about 45 seconds) or in the oven (8-10 minutes at 350°F).
For longer storage, they freeze beautifully. I wrap each roll-up individually in plastic wrap, then store them in a freezer bag for up to 3 months. To reheat from frozen, I thaw them overnight in the refrigerator, then warm them in the oven.
Nutritional Benefits
While these roll-ups are definitely an indulgent treat, they do offer some nutritional benefits. The cream cheese and mozzarella provide a good amount of protein and calcium, while the herbs add antioxidants and flavor without extra calories. Compared to traditional pizza, these roll-ups are significantly lower in carbohydrates, making them suitable for various dietary approaches.
Frequently Asked Questions
Q: Can I make these roll-ups ahead of time? A: Absolutely! You can assemble the roll-ups up to 24 hours in advance and store them covered in the refrigerator. When ready to serve, just bake them as directed, adding an extra 2-3 minutes to account for the chilled temperature.
Q: What if my cream cheese mixture is too soft to roll? A: If your mixture seems too soft, pop it in the refrigerator for 15-20 minutes to firm up. You can also try adding a bit more shredded cheese to help bind everything together.
Q: Can I substitute the marinara sauce? A: Definitely! I’ve used pesto, alfredo sauce, and even a simple olive oil and herb mixture. Just keep in mind that wet sauces can make the roll-ups a bit messier, so use them sparingly.
Q: How do I prevent the roll-ups from falling apart? A: The key is not overfilling them and making sure your cheese mixture is the right consistency. Also, always bake them seam-side down to help them hold their shape.
Q: Can I make these without baking them? A: While you could serve them unbaked, I really recommend the baking step. It melds all the flavors together and gives the outside a lovely texture that makes them much more appealing.
Final Thoughts
These pepperoni pizza roll-ups have become one of my most requested recipes, and I completely understand why. They satisfy that pizza craving while being relatively quick and easy to prepare. Whether you’re looking for a crowd-pleasing appetizer, a satisfying lunch, or a fun dinner option, these roll-ups deliver every time.
The best part is how customizable they are – once you master the basic technique, you can experiment with different combinations of ingredients to create your own signature variations. I encourage you to start with this classic pepperoni version, then let your creativity guide you to new flavor combinations.
Remember, cooking should be enjoyable, so don’t stress if your first batch isn’t perfect. Even imperfect roll-ups taste delicious, and you’ll improve with each attempt. Happy cooking, and I hope these pepperoni pizza roll-ups bring as much joy to your kitchen as they have to mine!