You know that moment when you think keto means saying goodbye to dessert forever?
Yeah, I had that moment too.
But here’s the thing. I was so wrong. And today, I’m going to prove it to you with these caramel brownie bites that taste like pure sin but won’t kick you out of ketosis.
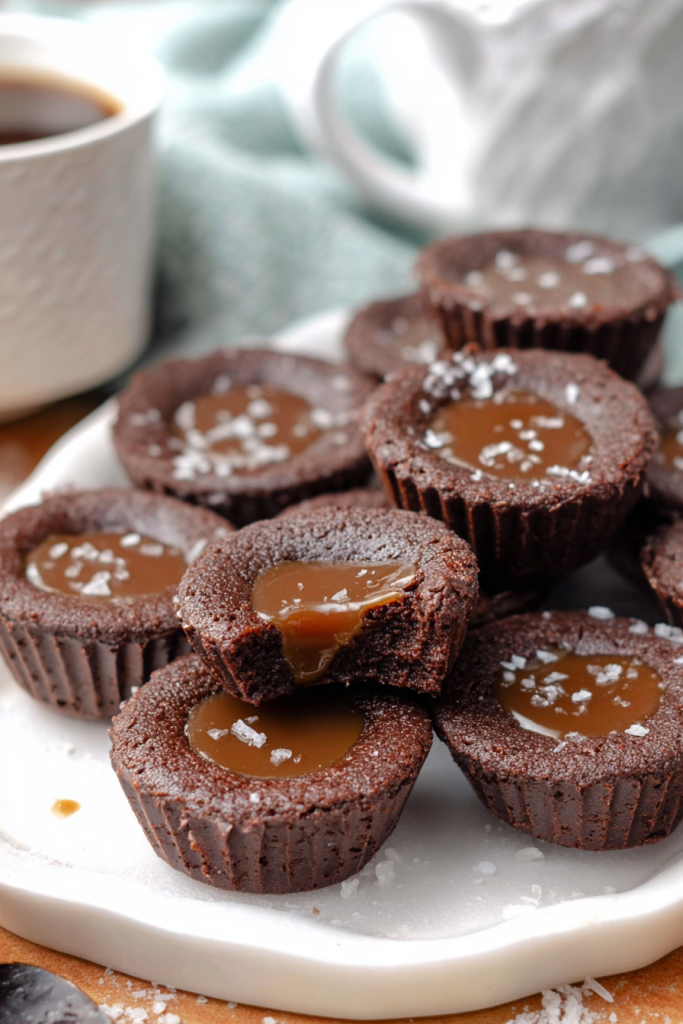
Picture this: You bite into a fudgy chocolate brownie. Crispy edges. Tender middle. Then BAM – a pool of smooth, buttery caramel hits your tongue. A sprinkle of sea salt ties everything together.
Sounds too good for low-carb, right?
That’s what I thought. Until I nailed this recipe after about a million tries (okay, maybe not a million, but close).
What Makes These Special
Look, I’ve wasted hours in my kitchen trying to crack the code on keto desserts.
These brownie bites? They’re different. Here’s why:
First, they’re already portioned out. No more standing at the counter with a knife trying to cut “just a small piece” and ending up with half the pan. The serving size is built in.
Second, the texture is perfect. Crispy on the outside, soft on the inside. Not cakey. Not too dense. Just right.
Third, that caramel filling isn’t some afterthought. It’s the star.
The magic trick? You create little wells in the brownies while they’re still warm. These pockets become perfect little vessels for that gooey sugar-free caramel. When everything cools and sets together, you get this crazy contrast of textures and flavors.
The result?
A dessert so good that nobody – and I mean nobody – will guess it’s keto-friendly.
My Journey to the Perfect Recipe
Can I be honest with you?
Creating sugar-free caramel that actually stays pourable was a nightmare. Traditional caramel depends on sugar doing its sugar thing. When you swap in keto sweeteners, everything goes sideways.
Some batches turned into rock candy within hours. Others never got that silky texture I was chasing. I probably threw out 20 batches before I got it right.
The breakthrough?
Finding the perfect combo of sweeteners. Allulose and erythritol work together like magic. The allulose stops the crystallization problem. The erythritol brings sweetness without messing with your blood sugar.
Science meeting art in your kitchen. That’s what it is.
The brownie base had its own drama. Too much flour substitute? Dry and crumbly. Too little? Gooey disaster. The ratio in this recipe hits that sweet spot where the brownies hold their shape but still give you that fudgy bite.
Why You’ll Love Making These
Beyond tasting amazing (which they do), these brownie bites are actually practical.
The mini muffin pan format means every single bite is the same size. No guessing. No debating if your piece is too big. Each one has roughly the same ingredients and carbs.
They’re also super versatile:
- Hosting a party? They look fancy on a dessert platter
- Need a quick treat after dinner? Grab two from the fridge
- Want to impress someone special? Dust with cocoa powder and serve on a nice plate
They work for literally any occasion.
The best part?
Once you nail this technique, you’ll understand the fundamentals of keto baking. These skills transfer to tons of other recipes. You’ll start experimenting with your own flavor combos. You’ll feel like a keto baking wizard.
Ingredients, Instructions & Pro Tips
Essential Ingredients
Okay, let’s talk about what you need. I’ve laid it out super clearly so you can get everything ready before you start.
| Ingredient | Quantity | Notes |
|---|---|---|
| Keto brownie batter | 1 complete recipe | Pick almond or coconut flour based |
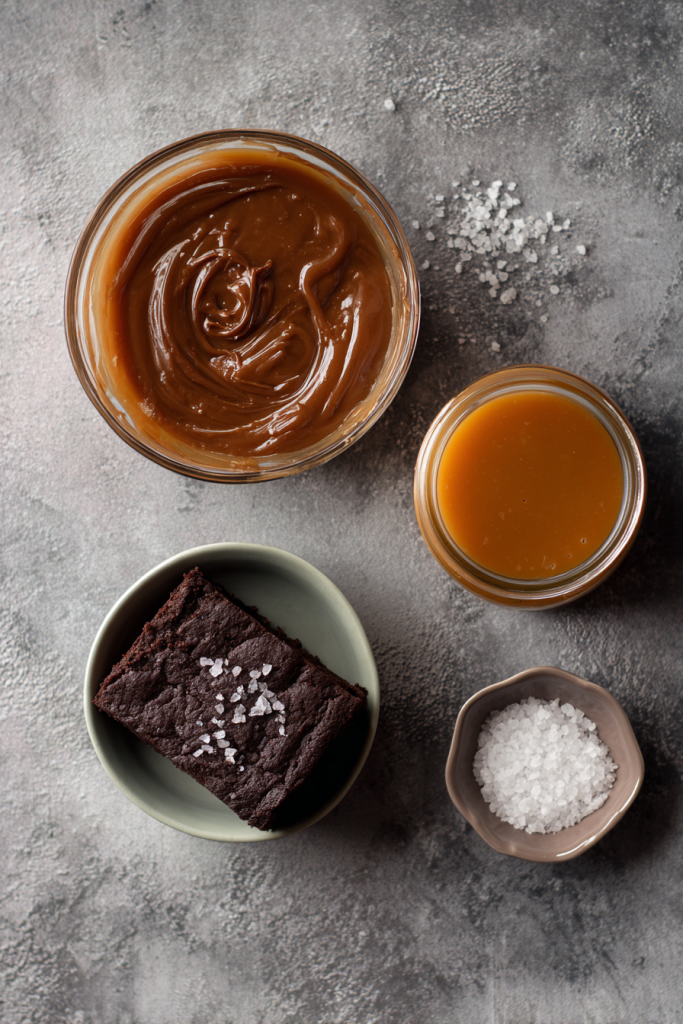
| Sugar-free caramel sauce | 1 complete recipe | Make it fresh – don’t skip this |
| Flaked sea salt | For sprinkling | This is crucial for flavor |
Prep Time: 20 minutes | Cook Time: 15 minutes | Total Time: 35 minutes (plus setting time)
Servings: 12 (2 brownie bites per serving) | Difficulty: Easy
Understanding Your Ingredients
The brownie base is your foundation here.
I’m team almond flour all the way. The texture is rich and dense. They hold up beautifully when you press those wells in. But if you need nut-free? Coconut flour works great too.
Just know this: coconut flour is like a sponge. It absorbs way more liquid. Your texture will be a bit different. Still delicious. Just different.
Your caramel sauce needs some attention to detail. The sweetener combo matters. A lot. Don’t try to wing it with regular sugar or you’ll blow the carb count. Stick with the recommended blend.
The xanthan gum? That’s your stabilizer. Without it, your caramel might separate or get too thin. Trust the process.
Sea salt technically isn’t required. But in my book? It’s non-negotiable. That salty-sweet contrast takes these from “pretty good” to “oh my god where have these been all my life.” The flakes give you little flavor bursts that make the chocolate and caramel sing.
Step-by-Step Instructions
Alright, let’s cook. I’ll walk you through every stage with the tips I learned the hard way.
Stage One: Preparation
Fire up your oven to 350°F.
This temp is the sweet spot. Too hot? Dry brownies. Too cool? They won’t set right.
While the oven heats, line your mini muffin pan with silicone or parchment liners.
This step is CRUCIAL.
Regular paper liners? They’ll stick like super glue. You’ll lose half your brownie trying to peel them off. Don’t do it.
Prep your brownie batter following whatever recipe you chose. The one change you need to make: leave out any chocolate chips. We need smooth brownies here. Chocolate chips will mess with you when you’re making wells later.
Trust me on this one. I learned it the hard way.
Stage Two: Baking the Base
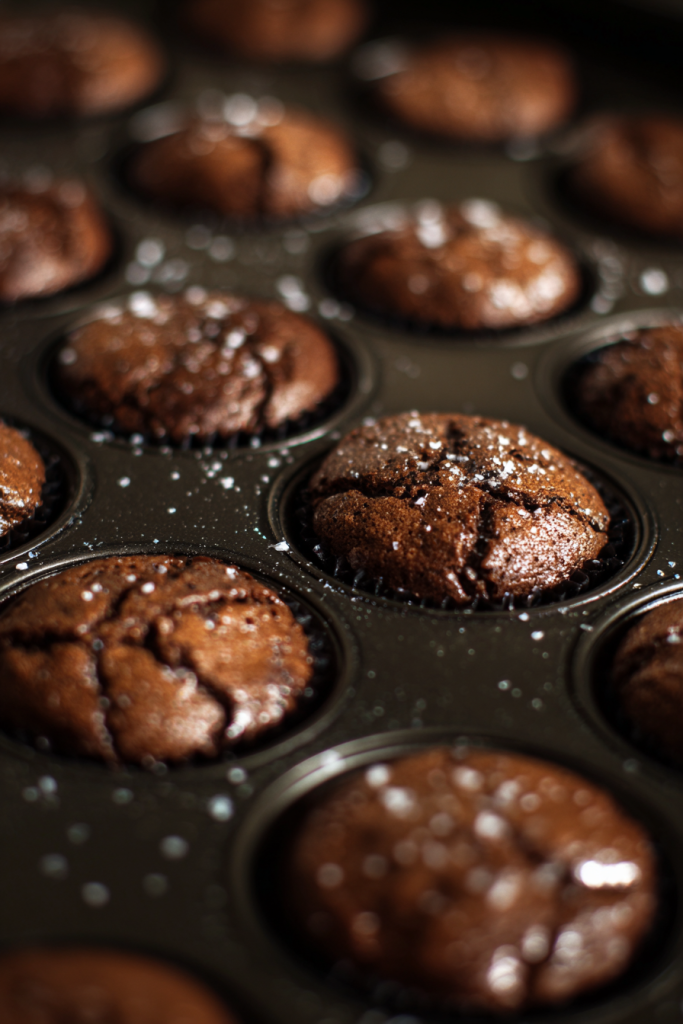
Divide your batter evenly among 24 muffin cups.
I use a small cookie scoop. Keeps everything consistent. Fill each cup about two-thirds full. This gives the brownies room to puff up without overflowing.
Slide the pan into your oven. Set a timer for 15 minutes.
What you’re looking for: brownies that are puffed and just barely set when you touch them. They should still have a tiny jiggle in the center.
Remember – they keep cooking as they cool.
Better to pull them out slightly underdone than to overbake them. Overbaked keto brownies are like eating chocolate-flavored sawdust. Not fun.
Stage Three: The Caramel
While your brownies bake, make your caramel sauce.
Timing is everything here.
The caramel needs about 20 minutes to cool and thicken to the right consistency. Make it too early? It’ll be cement. Too late? Watery mess.
Follow your caramel recipe exactly. The process goes like this: melt butter with sweeteners, then add cream.
When you add the cream, the mixture will bubble like crazy.
Don’t panic. This is totally normal. Just step back a bit and keep whisking steadily. Everything will smooth out.
The xanthan gum goes in last. Sprinkle it over the surface while you whisk constantly. This stops clumps from forming. Once it’s mixed in, your caramel will have this beautiful glossy shine.
Let it cool to room temp.
It should be thick enough to coat the back of a spoon but still pour.
Stage Four: Creating the Wells
Pull your brownies out when they’re done. Let them sit in the pan for exactly 10 minutes.
Not 5 minutes. Not 15 minutes. Ten.
This cooling time is essential. Too soon and they’ll fall apart. Too long and they’ll be too firm.
Now for the fun part.
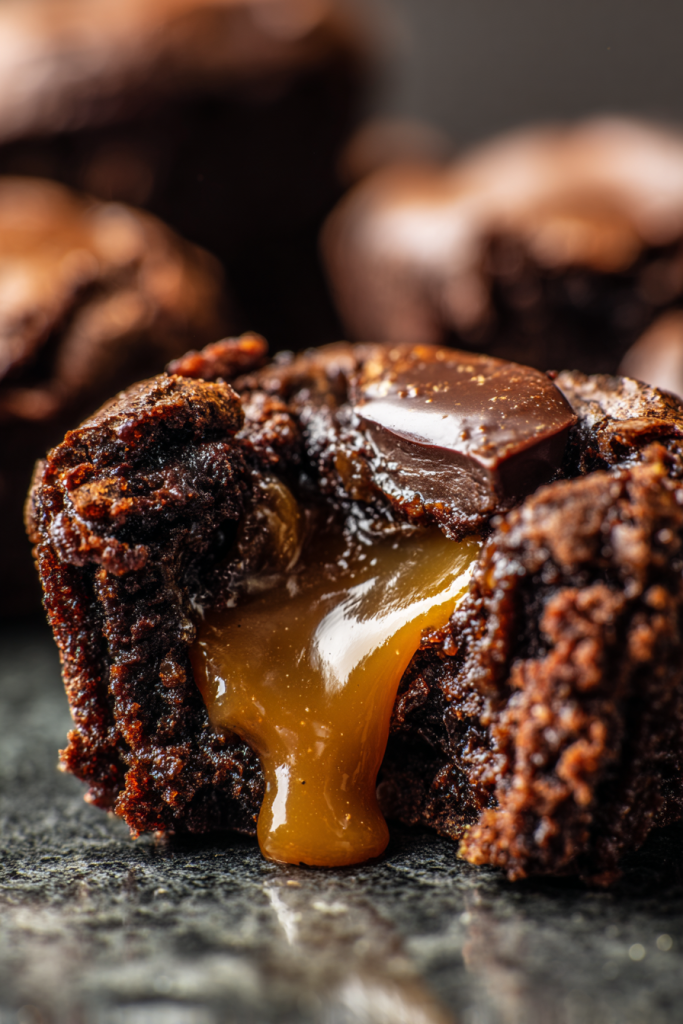
Grab a small spoon or the handle of a wooden spoon. Gently press it into the center of each brownie. You’re making a well.
Don’t go all the way to the bottom. Leave about a quarter-inch of brownie there. Twist the spoon slightly as you press. This creates a nice round cavity that’s perfect for holding caramel.
Work carefully but don’t stress. Even if some wells aren’t Instagram-perfect, the caramel will hide your mistakes. The brownie edges might crack a little. That’s normal. Actually looks kind of rustic and cool.
Stage Five: The Final Assembly
Let your brownies cool completely before you fill them. This takes about 30 minutes at room temp.
I know. Waiting sucks.
But patience here stops the caramel from soaking into the brownie. You want it sitting pretty in that well, not disappearing.
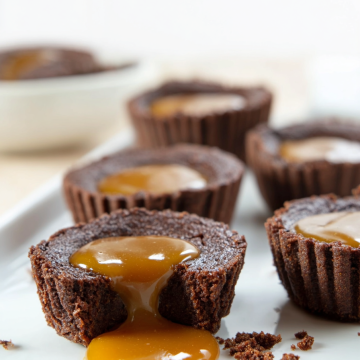
Once they’re cool, grab your caramel sauce. Use a small spoon to carefully fill each well.
Don’t overfill. You’ll have caramel running down the sides. Fill to just below the rim. The caramel will settle a bit as it sits.
Right after filling, sprinkle each brownie with a few flakes of sea salt. Do this while the caramel is still slightly warm. Helps the flakes stick better.
Critical Tips for Success
Let me share some tricks that’ll make your life easier.
Temperature Control
Room temp ingredients mix way better. Pull your eggs and butter out 30 minutes before you start. Cold butter won’t blend into the batter properly.
Liner Selection
Buy good silicone liners. They’re reusable and nothing sticks to them. Parchment liners work too but silicone is better.
Regular paper liners will absolutely ruin your brownies. I wasted a whole batch learning this lesson. Don’t be me.
Testing Doneness
At the 15-minute mark, gently touch the top of a brownie. It should spring back slightly but not leave a dent. If your finger sinks in? Give it another minute or two.
Caramel Consistency
Your caramel should drizzle slowly off a spoon.
Too thick? Warm it gently and whisk in a teaspoon of cream.
Too thin? Let it cool longer. The xanthan gum keeps working as it cools.
Storage Wisdom
These keep great in an airtight container.
Counter storage: 3-4 days
Fridge: Full week
Freezer: Several months
For freezing, put them on a baking sheet in a single layer first. Once they’re frozen solid, move them to a freezer bag. This stops them from sticking together.
Variations, FAQs & Final Thoughts
Creative Variations
Once you’ve got the basic recipe down, you can go wild. I love playing with different flavors.
Chocolate Drizzle
Melt some sugar-free chocolate chips. Drizzle over the top after the caramel sets. Use a fork to make thin, pretty lines across the brownies.
This adds another layer of chocolate heaven.
Nut Topping
Press a pecan or walnut half into each caramel-filled well. Now you’ve got a turtle situation going on. The nuts add crunch and healthy fats.
Pro tip: Toast the nuts first. The flavor goes way up.
Espresso Enhancement
Add a teaspoon of instant espresso powder to your brownie batter. Coffee makes chocolate taste more chocolate-y. It’s weird science but it works.
The subtle bitterness balances the sweet caramel perfectly.
Mint Twist
Stir a few drops of peppermint extract into your caramel sauce. Start with just two or three drops.
Peppermint is powerful stuff. You can always add more. This makes a refreshing holiday variation.

Frequently Asked Questions
Can I use store-bought brownie mix?
Absolutely.
Lots of keto brownie mixes work for this recipe. Just check the net carb count to make sure it fits your macros. Prep according to the box, then follow my instructions for the wells and caramel.
The homemade version gives you more control over texture and sweetness. But convenience matters too. No judgment here.
What if I don’t have allulose for the caramel?
You’ve got options.
Xylitol works as a substitute. The texture will be slightly different but it’ll work. Use the same amount your caramel recipe calls for.
Another option? Add a small amount of yacon syrup. This helps prevent crystallization like allulose does. Your carb count goes up a tiny bit but stays reasonable.
How do I prevent the caramel from hardening?
The key is that sweetener combo.
Pure erythritol will crystallize as it cools. That’s why we mix it with allulose. Store your finished brownie bites at room temp if you can. The fridge makes caramel firm up.
If it does harden, let them sit at room temp for 15 minutes before eating. Problem solved.
Can these be made nut-free?
Yes!
Use coconut flour brownies instead of almond flour. Coconut flour soaks up more moisture, so the texture changes. They’ll be more cake-like than fudgy.
Still delicious though.
Make sure all your other ingredients are nut-free too. Check labels on chocolate and sweeteners carefully. Manufacturers sometimes add sneaky stuff.
How many can I eat and stay in ketosis?
This depends on your personal carb limit and what else you ate that day.
Each serving (two brownie bites) has about 1.4g net carbs. Most people doing keto aim for 20-50g net carbs daily. These fit easily.
But watch your total daily intake. It’s really easy to go overboard when something tastes this good. I speak from experience.
Troubleshooting Common Issues
Sometimes things go sideways. Here’s how to fix common problems.
Brownies Too Dry
You probably overbaked them. Keto brownies need less time than regular ones. Next time, check at 12 minutes.
Remember – they keep cooking as they cool. Slightly underdone beats overdone every time.
Wells Falling Apart
The brownies didn’t cool long enough before you pressed them. Wait the full 10 minutes.
Also, make sure you’re using silicone or parchment liners. Paper liners make brownies super fragile.
Caramel Too Runny
It needs more cooling time. Let it sit at room temp for 30 minutes. The xanthan gum needs time to do its thing.
Still thin? Gently reheat and add a tiny pinch more xanthan gum.
Caramel Crystallized
This happens when you use too much erythritol without enough allulose.
If your caramel already crystallized, you can’t fix it. Sorry. Prevention is everything here. Follow the sweetener ratios exactly.
Making Ahead and Meal Prep
These brownie bites are perfect for meal prep.
I make a double batch every Sunday. Then I’ve got grab-and-go desserts all week. The convenience really helps me stick to my eating plan.
For best results, store the brownies and caramel separately if you’re making them more than a day ahead. Fill the wells right before serving. This keeps the brownie texture perfect.
The caramel stays good in the fridge for two weeks. The unfilled brownies last a week at room temp.
When I freeze them, I wrap each brownie individually in plastic wrap. Then I put them all in a freezer bag. This way I can grab exactly how many I want.
Thaw at room temp for 30 minutes before eating.
Final Thoughts
These keto caramel brownie bites are everything I love about low-carb baking in one little package.
They prove you don’t have to sacrifice flavor for health. The combo of rich chocolate and smooth caramel completely satisfies dessert cravings.
Try this recipe even if you’re new to keto baking. The techniques you’ll learn transfer to tons of other recipes. You’ll get more confident working with alternative sweeteners and flours.
More importantly? You’ll discover that eating low-carb can be absolutely delicious.
The first time you bite into one of these, still slightly warm, with the caramel oozing out?
That’s a moment you’ll want to repeat.
And the best part? You can repeat it without guilt. These fit perfectly into a healthy lifestyle.
So grab your ingredients and give them a try. Take your time with each step. Pay attention to textures and temperatures.
Before you know it, you’ll be showing off these treats to friends and family. They won’t believe they’re sugar-free and low-carb.
Happy baking! I can’t wait for you to try these.
Nutritional Breakdown (per serving of 2 brownie bites):
| Nutrient | Amount |
|---|---|
| Calories | 192 |
| Total Carbs | 2.8g |
| Fiber | 1.4g |
| Net Carbs | 1.4g |
| Fat | 17.9g |
| Protein | 3.9g |
Note: These are estimates. Calculate based on your specific ingredients for accuracy.
Keto Caramel Brownie Bites
Ingredients
Brownie Base
- 1 complete recipe keto brownie batter almond or coconut flour based
Caramel Filling
- 1 complete recipe sugar-free caramel sauce made fresh
Topping
- flaked sea salt for sprinkling
Instructions
Preparation
- Preheat oven to 350°F.
- Line a mini muffin pan with silicone or parchment liners. Do not use regular paper liners as they will stick.
- Prepare your keto brownie batter according to the recipe, leaving out any chocolate chips.
Baking the Base
- Divide the brownie batter evenly among 24 mini muffin cups, filling each about two-thirds full. Use a small cookie scoop for consistency.
- Bake for 15 minutes, until brownies are puffed and just barely set with a tiny jiggle in the center. They should spring back slightly when touched.
Preparing the Caramel
- While brownies bake, prepare your sugar-free caramel sauce according to the recipe.
- Let the caramel cool to room temperature for about 20 minutes until it thickens to coat the back of a spoon but is still pourable.
Creating the Wells
- Remove brownies from oven and let sit in the pan for exactly 10 minutes.
- Using a small spoon or wooden spoon handle, gently press into the center of each brownie to create a well. Leave about a quarter-inch of brownie at the bottom. Twist slightly as you press to create a round cavity.
Final Assembly
- Let brownies cool completely at room temperature for about 30 minutes.
- Carefully fill each well with caramel sauce using a small spoon, filling to just below the rim.
- Immediately sprinkle each brownie with a few flakes of sea salt while the caramel is still slightly warm.
- Let set for 15-20 minutes before serving.